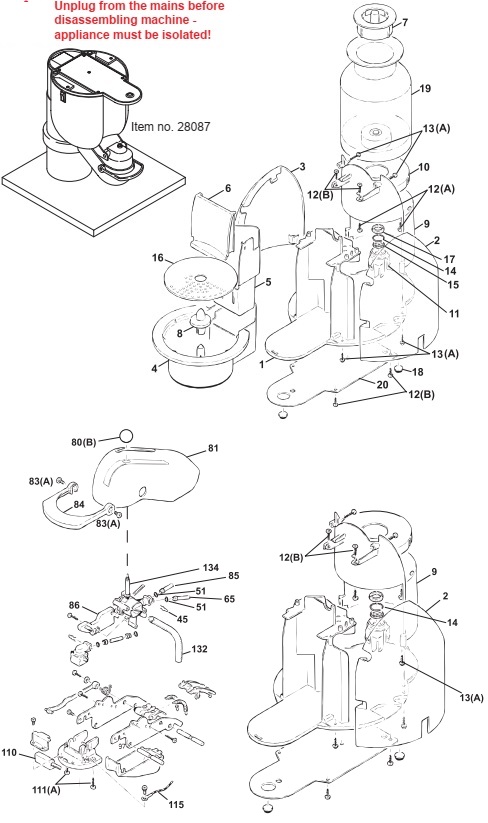
General disassembly (stage 1)
Tools:
- Special screwdriver (oval)
General information:
The screws are labelled with letters (A, B and C) in the figures.
These refer to the tightening torques for the screws.
A = 0,5 to 0,9 Nm
B = 0,8 to 1,4 Nm
C = 1,3 to 1,8 Nm
A and B can be tightened by hand (A = tighten lightly, B = tighten firmly).
For tightening screws labelled C it is imperative that a torque wrench is used.
Procedure:
1. Remove water tank, drip tray, and capsule container.
2. Place machine on the disassembly jig (item no. 28087).
3. Remove screws (13) on the underside and rear of the side pieces.
4. Remove side pieces (2 and 3).
General disassembly (stage 2)
Tools
- Torx screwdriver T10, T15
- Special screwdriver (oval)
Procedure
1. General disassembly stage 1.
2. Remove 3 bolts (13) on the cover at the rear (9) on the underside.
3. Open jaw and remove screws (111) on the cover.
4. Unscrew ball (80) on the jaw stick.
5. Remove screws (83) and closing lever (84).
6. Move cover (81) a little to the side and remove.
7. Remove 2 bolts (12) on the cover at the rear on the top.
8. Remove cover at the rear (9).

Replacing thermoblock
Tools / aids:
- Torx screwdriver T10, T15
- Flat nose pliers
- Open-ended spanner 8/10mm AF
- Pot to collect water
- Torque wrench
Procedure:
Tools / aids:
- Torx screwdriver T10, T15
- Flat nose pliers
- Open-ended spanner 8/10mm AF
- Pot to collect water
- Torque wrench
Procedure:
2.
Remove bolt (47) on the thermoblock (66).
3. Remove all electrical connectors.
4. Remove fine-wire fuse clip (43).
5. Remove NTC temperature sensor (64).
ATTENTION: Keep a pot at hand for collecting the water left in the thermoblock.
6. Remove water connections on the thermoblock.
7. Replace thermoblock (66).
8. Assemble in reverse sequence. Only tighten NTC temperature sensor lightly until the spring washer is flat. Tighten bolt (46) to torque C using torque wrench.
Replacing NTC
Tools:
- Open-ended spanner 10mm AF
Procedure:
1. Remove connector on the logic board
2. Undo NTC temperature sensor (64) replace
3. Assemble in reverse sequence. Only tighten NTC temperature sensor lightly until the spring washer is flat.
Tools:
- Open-ended spanner 10mm AF
Procedure:
1. Remove connector on the logic board
2. Undo NTC temperature sensor (64) replace
3. Assemble in reverse sequence. Only tighten NTC temperature sensor lightly until the spring washer is flat.

Replacing pump
Tools / aids:
- Torx screwdriver T10
- Open-ended spanner 14mm AF
- Long-nose pliers
- Pot to collect water
Procedure:
1. General disassembly stage 1
2. Remove all electrical connections
3. Remove steam switch (30, 63) on the underside of the appliance to make it easier to disassemble the pump
Tools / aids:
- Torx screwdriver T10
- Open-ended spanner 14mm AF
- Long-nose pliers
- Pot to collect water
Procedure:
1. General disassembly stage 1
2. Remove all electrical connections
3. Remove steam switch (30, 63) on the underside of the appliance to make it easier to disassemble the pump
4.
Remove clamp (45) and hose (65).
ATTENTION: Keep a pot at hand for collecting the water left in the pump.
5. Remove angled hose (57).
6. Release pump first from bottom rubber strap, then from the top rubber strap (54).
ATTENTION: Keep a pot at hand for collecting the water left in the pump.
5. Remove angled hose (57).
6. Release pump first from bottom rubber strap, then from the top rubber strap (54).
7.
Remove seal (51) and angle (37).
8. Replace pump (61).
9. Insert seal (51) and tighten corner connector (37).
10.Turn corner connector to the correct position using open-ended spanner on pump projection.
11.Remaining assembly in reverse sequence.
8. Replace pump (61).
9. Insert seal (51) and tighten corner connector (37).
10.Turn corner connector to the correct position using open-ended spanner on pump projection.
11.Remaining assembly in reverse sequence.


