Asus Zenfone 2 Display Assembly Replacement
The
original screen has the following code stamped on the back of the display:
"TL055VDXP34-00".
The first replacement display assembly (did not work) had the following code: "TLD55VVXP31-00".
The second replacement assembly (did work) had the following code: "TL055VDXP34-00".
On that basis, it is suggested that the first unit I received was an earlier model, and was the incorrect part. I assume that the replacement display assembly must be model TL055VDXP34-00
Remove back cover, sim card(s), and memory card.The first replacement display assembly (did not work) had the following code: "TLD55VVXP31-00".
The second replacement assembly (did work) had the following code: "TL055VDXP34-00".
On that basis, it is suggested that the first unit I received was an earlier model, and was the incorrect part. I assume that the replacement display assembly must be model TL055VDXP34-00
NOTE:
Remember to remove the one next to the camera (this might be covered by a small
sticker).
This cover should remove quite easily - if you can't lift it, count those screws! There should be 14. Again - check that one by the camera that is somewhat hidden.
NOTE These screws are actually the only screws which hold the phone together. Once these are out and the cover is up, the speaker unit will fall away from the phone.


Panel removal – removal of internals
To
remove the plastic panel pry it up at one end, and use a sharp blade to
separate the double sided tape between the battery and the plastic panel.
NOTE: remove the double sided tape completely when I put it back together. It doesn't seem to really be necessary.
NOTE: remove the double sided tape completely when I put it back together. It doesn't seem to really be necessary.
Remove
the antenna cable, vibrate motor, and four other connections.
The three above the battery pop up away from the phone.
The three above the battery pop up away from the phone.
To
disconnect the flat cable at the bottom of the battery you need to first remove
the yellow plastic sticker covering it. Next lift the white tab to release the
cable, then gently pull the cable out towards the base of the phone.
There
are two types of different adhesives holding in the battery that I have
encountered. One is double-sided foam tape (easy to remove). The other is some
kind of self-amalgamating tape (hard to remove). Please be VERY cautious when
removing the battery.
Ii is recommended heating the front side of the screen prior to completing this step (the battery tape is fixed behind the back of the screen).
The adhesive holding down the battery is located close to the side where the antennas are located (right side when looking down). To remove the battery, heat up the battery with a hair-dryer, then gently pull up away from the phone on the opposite site (left side).
NOTE: Be gentle with the small metal tabs on the edge of the battery; these are quite flimsy and will bend if used to force the battery. I removed the double sided tape completely here too, and did not replace it.


To
remove the display itself you'll need to apply heat. I had a heat gun - this
makes it a lot easier but you could use
a hair drier if you don't have a heat gun. For the sake of comparison - the
heat gun took around 30 seconds to heat the display completely, which would
take 3-5 minutes with a hair drier.
Once the adhesive behind the screen has been heated up, work your way around the edges of the screen with an opening pick or thin rigid guitar pick. The display will begin to separate from the housing.
Once mostly free, carefully lift the display cable through the hole in the top of the phone body.
Again; you're replacing this cable completely, so don't worry too much about it.
Removal of speaker grill
separate
the speaker grill from the original display, clean the adhesive off, and attach
it for the new screen. it easier to attach the grill to the actual phone body
(rather than the display assembly)
Because
of the condition of the adhesive for the screen assembly, replace the adhesive completely. You could
skip this step, but it is worth cleaning
it up.
To remove the existing adhesive just use the sharp razor blade and worked peeling it all off.
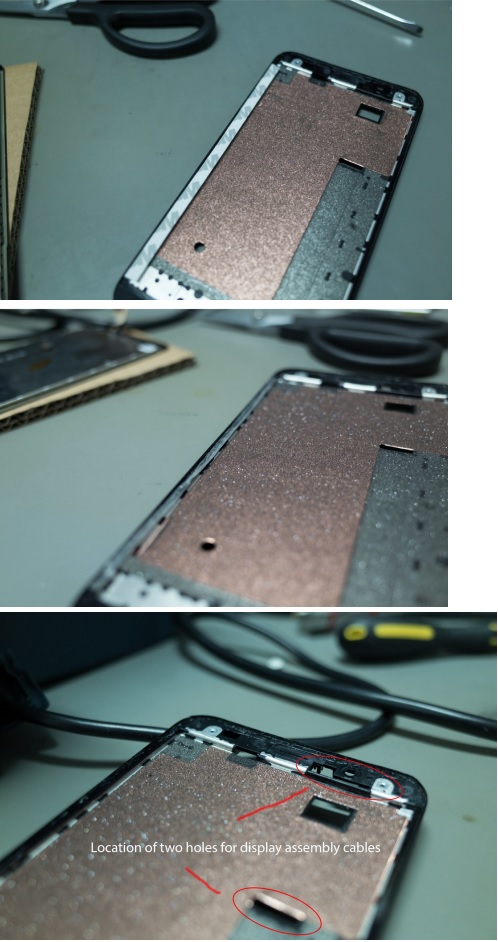
NOTE: This would be a good opportunity to 'test fit' the new screen (without adhesive) so you can see where the cables need to go. There is one which goes up behind the screen and through the middle of the phone, and another which goes through the top hole. The top one is a strange shape, and needs to go through sideways first.
To remove the existing adhesive just use the sharp razor blade and worked peeling it all off.
NOTE: This would be a good opportunity to 'test fit' the new screen (without adhesive) so you can see where the cables need to go. There is one which goes up behind the screen and through the middle of the phone, and another which goes through the top hole. The top one is a strange shape, and needs to go through sideways first.

To attach a new display
3M
double sided adhesive tape to go around the edge of the new screen assembly.
NOTE: The replacement adhesive I used was 3M double sided adhesive tape (2mm) - the tape can be purchased was around from a mobile phone repair supplies store. The tape was too wide and not thick enough, so I doubled it over.
It fit perfectly once I did that. Unless you can find thicker double sided tape which is closer to the original adhesive, I would recommend this approach.
Once
the adhesive is all laid out on the phone, put the screen assembly on. start
from the top and slide the top cable through the hole, then slowly worked my
way down to the bottom.
NOTE: don't press too hard on the adhesive until you are sure that both cables are through to the back, and that the screen is sitting well in the body.
NOTE: don't press too hard on the adhesive until you are sure that both cables are through to the back, and that the screen is sitting well in the body.
Display cable attach
Looking
at the phone from the back, remove the adhesive backing from the display cable
and carefully position the cable between the four black markers.
After
the new screen is fixed in, start the re-assembly. This is effectively the same
as disassembly, but in reverse. There were only a couple of parts that make
note of:

a)
Keep an eye on the display cable that comes in through the top. It got caught
on the double sided tape, and needed to be pulled through.
b) You will need to use a little bit of force to mount the processor unit between the four plastic clips. Be careful when doing this.
c) completely remove the double sided tape from under the battery and under the plastic case.
d) If you lose any of the yellow plastic cable stickers, you can borrow a piece from your old display assembly.


