Sunday, 23 April 2017

Sony Trinitron KV28D60U - How to make adjustments Error Codes

Sony KV28d60U, Sony32D60U Trinitron TVs Service adjustments
SELF DIAGNOSTIC SOFTWARE
The identification of errors within the GE-1A chassis is triggered in one of two ways :- 1: Busy or 2: Device failure to respond to IIC. In the event of one of these situations arising the software will first try to release the bus if busy (Failure to do so will report with continuous flashing LED) and then communicate with each device in turn to establish if a device is faulty. If a device is found to be faulty the relevant device number will be displayed through the LED (Series of flashes which must be counted) See table 1., non fatal errors are reported using this method.
Diagnostic Item, Description, No of times Standby LED Flashes, Probable cause ,Location Detected Symptoms
Power does not turn on Does not light Power cord is not plugged in, Fuse is burned out
Power does not come on No power is supplied to the TV
AC power supply is faulty
+B Overvoltage(OVP) 2 times H.OUT (Q502) is shorted. (D Board)
IC603 Power IC is shorted. (D Board) Power does not come on
Load on power line has shorted
Vertical Deflection stopped 4 times +15V is not supplied R519 open (D Board)
-15V is not supplied R518 open (D Board)
IC502 is shorted (D Board) Vertical deflection pulse has stopped
Power line has shorted
Error codes
No error 00
Not allowed (may be confused with Sircs response flash) 01
Over Current Protection - 02
Over Voltage Protection -03
Vertical Protection -04
No function- 05
H - Protection-06
Speaker Protection-07
MEGATEXT-08
NVM -09
Main colour decoder -10
Feature Box 1 -11
D/A converter -12
Multi Component processor -13
Multi sound processor -14
DMUX -15
Feature Box 2 -16
ERROR DETECTION MONITOR
Device acknowledges is used to check IIC errors. Device acknowledge is checked by sending an IIC start sequence during CRT power on. Each device is checked three times, if there is no acknowledge after every attempt, it will be regarded as an error.
There are three steps to check errors
1. IIC line 0
If all devices except the NVM are errors, IIC line 0 error is displayed
2. Board check
If all devices mounted on one board have errors, board error is displayed
3. Each device check
If IIC line error and board error are not detected then the device with an error is displayed
The detected errors can be displayed as follows:
1. Error Monitor Menu
2. Error Reader
ERROR MONITOR MENU
The error monitor menu is displayed by selecting TT22. The following menu will be displayed:
ERROR READER DISPLAY
The error reader display is connected to the service connector to read actual error codes. The part number for the error reader display is S-188-900-10.
Once an error has been detected it will then be displayed on the two digit error reader.
White balance adjustment
1. Input an all-white signal.
2. Enter into the Service Mode by pressing ‘TEST’, ‘TEST’ and ‘MENU’ ‘MENU’on the Service Commander.
3. Move the OK button down until ‘MCP CXA2101’is selected then move the OK button to the right.The ‘MCP CXA2101’ menu will appear on the screen.
4. Select ‘19 R DRIVE’ by moving the OK button down until ’19 R DRIVE’ is selected then move the OK button to the right and adjust to 41 by pushing the OK button up or down.
5. Press the OK button to write the data.
6. Adjust the ‘21 G DRIVE’ and ‘23 B DRIVE’ so that the white balance becomes optimum.
7. Press the OK button to write the data.
8. Input a 5 - 10 NIT all-white signal.
9. Select ‘25 R CUT-OFF’ by moving the OK button down until ‘25 R CUT-OFF’ is selected then move the OK button to the right and adjust to 41 by pushing the OK button up or down.
10. Adjust the ‘27 G CUT-OFF’, and ‘29 B CUT-OFF’ so that the white balance becomes optimum.
11. Press the OK button to write the data.
1 RED ON
2 GREEN ON
3 BLUE ON
4 CBLK OFF
5 AKB T OFF
6 BLK SW OFF
7 DA TEST OFF
8 HY SW 0
9 PICTURE 57
10 LIMIT LEVEL 1
11 HUE 31
12 SYSTEM 1
13 COLOR 31
14 AGE WHT OFF
15 AGE BLK OFF
16 BRIGHT 31
17 YS/YM SW 0
18 YM/VM 0
19 SHARPNESS 35
20 D COL 0
21 G DRIVE ADJ
22 CLP SW 1
23 B DRIVE ADJ
24 CLP MSK 0
25 R CUT OFF 32
26 ABL MODE 2
27 G CUT OFF ADJ
28 ABL TH 1
29 B CUT OFF ADJ
30 SUB BRT ADJ
31 H SEP SEL 1
32 FIX SEL 0
33 V - TC 2
34 H WIDTH 0
35 HD TC 1
36 HS MASK 1
37 CB OFF SET 1 7
38 CR OFF SET 1 7
39 CB OFF SET 2 7
40 CR OFF SET 2 7
How to enter the service mode
Turn on the main power switch of the set while pressing the PROG + and PROG - buttons on the top panel.
‘TT--’ will appear in the upper right corner of the screen.
Other status information will also be displayed.
Press ‘MENU’ ‘MENU’ on the remote commander to obtain the following menu on the screen.
Init TV
Sound MSP3410D
Feature Box S87654
Deflect Cont. SDA9361
Deflect Cont.Subadjust
MCP CXA2101
Col.Dec.Main TDA9144
DA SDA9280
Line 23 Detection
Sub Adjust
Port Expander
Move to the corresponding adjustment item by pushing the OK button up or down.
Push the OK button to the right to enter into the required adjustment.
Press the ‘Menu’ button and ‘00’ on the Remote Commander to quit the Service Mode when all adjustments have been completed.
Center adjustment for Digital Mode
1. Input a Digital test pattern.
2. Switch the TV into Digital mode.
3. Enter into the service menu by pressing ‘TEST’ ‘TEST’ and ‘MENU’ ‘MENU’ on the remote commander.
4. Select ‘Deflect.Cont SDA9316’ from the ‘Devices’ menu.
5. The ‘Deflect.Cont SDA9316’ menu will appear on screen.
6. Adjust ‘48 INT H PHASE’ so that the picture is in the center of the screen.
7. Adjust ‘1 V size’ and ‘2 V position’so that the picture is in the center of the screen.
Center adjustment for 4:3 Mode
1. Input a Sony special pattern.
2. Switch the TV into Analogue 4:3 mode.
3. Enter into the service menu by pressing ‘TEST’ ‘TEST’ and ‘MENU’ ‘MENU’ on the remote commander.
4. Select ‘DA SDA9280’ from the ‘Devices’ menu.
5. The ‘DA SDA9280’ menu will appear on screen.
6. Adjust ‘29 BCKPOS’ so that the picture is in the center of the screen.
Deflection adjustment Wide Mode
1. Input an Phillips pattern.
2. Switch the TV into wide mode.
3. Enter into the service menu by pressing ‘TEST’ ‘TEST’ and ‘MENU’ ‘MENU’ on the remote commander.
4. Select ‘Deflect.Cont SDA9361’ from the ‘Devices’ menu.
5. The ‘Deflect.Cont SDA9361’ menu will appear on screen.
6. Select and adjust each item to obtain optimum image.
7. Return to the ‘Devices’ menu.
8. Select the ‘Sub Adjust’ menu.
9. Select and adjust each item to obtain optimum image.
10. Repeat above steps in Digital mode.
Deflection adjustment for Smart Mode
1. Input a Phillips pattern.
2. Switch the TV into smart mode.
3. Enter into the service menu by pressing ‘TEST’ ‘TEST’ and ‘MENU’ ‘MENU’ on the remote commander.
4. Select ‘Deflect.Cont SDA9361’ from the ‘Devices’ menu.
5. The ‘Deflect.Cont SDA9361’ menu will appear on screen.
6. Select and adjust each item to obtain optimum image.
7. Return to the ‘Devices’ menu.
8. Select the ‘Deflect cont.Subadjust’ menu.
9. Select and adjust each item to obtain optimum image.
10. Return to the ‘Devices’ menu.
11. Select the ‘Subadjust’ menu.
12. Select and adjust each item to obtain optimum image.
13. Repeat above steps in Digital mode.
TEST MODE 2
Is available by pressing ‘TEST’ button twice, OSD ‘TT’ appears. The functions described below are available by pressing the two numbers. To release the Test mode 2, press 0 twice, or switch the TV into stand-by mode, or press the TV button on the remote commander.

Wednesday, 12 April 2017

Samsung LED TV UA19F4000AR - How to upgrade the software, white balance adjustment, color calibration

UA28F4000AR UA28F4100AR UA22F5000AR UA22F5100AR; Universal remote control set-up codes for Samsung TVs
Software Upgrade
Software Upgrade can be performed by downloading the latest firmware from Samsung to a USB memory device.
 Current Version - The software already installed in the TV.
Software is represented as ‘Year/Month/Day_Version’.
How to Check the Software VersionUse the Main Menu
1. Click the "MENU" key in remote controller.
2. Select "Support" menu.
3. Locate the menu cursor "Software Upgrade" menu.
4. Click the "INFO" key.
- Check the Main SW and Micom version.
How to Upgrade Software and Micom
Insert a USB drive containing the firmware upgrade downloaded from samsung.com into the TV. Please be careful not to disconnect the power or remove the USB drive while upgrades are being applied. The TV will turn off and turn on automatically after completing the firmware upgrade. Check the firmware version after the upgrades are complete  (the new version will have a higher number than the older version). When software is upgraded, video and audio settings you have made will return to their default (factory) settings. We recommend you write down your settings before beginning firmware update. After update is completed, restore your previous settings.
Main Software Upgrade
1. Save the frmware([FHD]"T-M13FMASC" or [HD]"T-M13HMASC") folder to the root directory of a USB drive.
- Connect the USB.
2. Click the "MENU" key in Remote Controller.
3. Select "Support" menu.
Select "Software Upgrade"
4. Click the "ENTER" key.
5. Click the "ENTER" key.
 Wait for upgrade complete.   Check the Software Version.
Color Calibration (AV)
1. Apply the NTSC Lattice (N0. 3) pattern signal to the AV IN 1 port.
2. Press the Source key to switch to “AV1” mode.
3. Enter Service mode.
4. Select the “ADC” menu.
5. Select the “AV Calibration” menu.
6. In “AV Calibration Off” status, press the “► ” key to perform Calibration.
7. When Calibration is complete, it returns to the high-level menu.
8. You can see the change of the “AV Calibration” status from Failure to Success.
Color Calibration (Component)
1. Apply the 720p Lattice (N0. 6) pattern signal to the Component IN 1 port.
2. Press the Source key to switch to “Component1” mode.
3. Enter Service mode.
4. Select the “ADC” menu.
5. Select the “Comp Calibration” menu.
6. In “Comp Calibration Off” status, press the “►” key to perform Calibration.
7. When Calibration is complete, it returns to the high-level menu.
8. You can see the change of the “Comp Calibration” status from Failure to Success.
Color Calibration (HDMI)
1. Apply the 720p Lattice (N0. 6) pattern signal to the HDMI1/DVI IN port.
2. Press the Source key to switch to “HDMI1” mode.
3. Enter Service mode.
4. Select the “ADC” menu.
5. Select the “HDMI Calibration” menu.
6. In “HDMI Calibration Off” status, press the “►” key to perform Calibration.
7. When Calibration is complete, it returns to the high-level menu.
8. You can see the change of the “HDMI Calibration” status from Failure to Success.
Adjustment
1. Into the Factory Mode.
2. Select SVC Menu.
3. Select ADC/WB menu.
4. Select White Balance menu.
White Ratio (Balance) Adjustment
1. You can adjust the white ratio in factory mode (1:Calibration, 3:White-Balance).
2. Since the adjustment value and the data value vary depending on the input source, you have to adjust these in CVBS,
Component 1 and HDMI 1 modes.
3. The optimal values for each mode are configured by default. It varies with Panel’s size and Specification.
 Equipment : CS-210
 Pattern: MIK K-7256 #92 “Flat W/B Pattern" as standard
 Altenate Equipmet : CA200& anyone Master supported pattern#92 
 Use other Equipment only after comparing the result with that of the Master equipment.
 Set Aging time : 60 min.
Calibration and Manual setting for WB adjustment
HDMI : Calibration at #24 Chessboard Pattern Manual adjustment at #92 pattern (720p)
COMP: Calibration at #24 Chessboard Pattern Manual adjustment at #92 pattern (720p)
CVBS: Calibration at #24 Chessboard Pattern Manual adjustment at #92 pattern (NTSC)
Entering Factory Mode [Service mode]
To enter ‘Service Mode’ Press the remote -control keys in this sequence :
If you do not have Factory remote control;
"Power off > Info > Menu > Mute > Power on"
If you have Factory remote control;
" Info > Factory"
If you don’t have Factory remote control, can’t control some menus.
Universal remote control set-up code list for Samsung Televisions
0030 0049 0050 0066 0076 0101 0102 0119 0143 0152 0154 0166 0181 0195 0209 0217 0240 0307 0318 0365 0379 0414 0421 0488 0492 0601 0624 0637 0642 0827

Friday, 10 March 2017

Universal remote control setup codes for TVs, VCRs and other devices

What are the universal remote control setup codes for TCL, Hitachi, Upstar, RCA, Dynex, Hisense, Philips, Element and Panasonic devices
Universal Remote Codes for TCL (Roku) TV
ATT Uverse = 1346
Bright House Cable = 1756
Cablevision = 031
Charter = 11756
Comcast = 11756
Cox = 1756
DirecTV = 11756
Dish Network = 535
ONN = 3851
RCA = 11756
Time Warner = 387 or 1566
TIVO = 0091 or 0366
Verizon = 180
4 Digit Universal Remote Control Codes For Hitachi TVs
Hitachi 4 digit TV remote codes
1004 1009 1010 1013 1053 1057 1058
1065 1078 1083 1113 1114 1115 1128 1173
Hitachi TV Codes
1004 1011 1012 1051 1052 1084 1086 1087
1102 1225 1384
Hitachi DVD Codes
2000 2027 2126 2173 2240
Hitachi Amplifier Code
6034
Hitachi HDTV Codes
1030 1132 1133 1134 1191 1208 1209
1210 1211 1212 1226 
Hitachi VCR Codes
3052 3055 3117 3169
Hitachi Receiver Tuner Code
5159
5 digit remote codes for Dynex TV = 10463 11463, 11780, 11785
4 digit remote codes for Dynex TV = 0490, 0463, 0783, 1944, 1250, 0464
5 digit remote codes for DYNEX TVs
10180 10178 10171 10623 11963 10096
10463 10154 10236 10463
4 digit codes to use with your DYNEX TV
0177 0185 0282 0039 0280 0038 0154 0236
0463 0180 0178 0179 0019 0623
ON MOST REMOTES
1. Turn on the TV.
2. Press and hold the TV and SEL buttons simultaneously for 3 seconds. The button will light.
3. With the button lit, point the remote at the TV and enter the TV’s 3, 4, or 5 digit code.
4. Verify by pressing the VOLUME + button. This should turn the TV VOLUME up.
5. Press the TV button to store the 3, 4, or 5 digit code. The button will blink twice to confirm the code is stored.
DYNEX TV can be controlled with a universal remote and work with Comcast, Dish Network, Direct TV, RCA, etc…
Upstar TV Universal Remote Control Codes
0037 0056 0442 0001 0370 1178 0002
0009 0702 0774 0093 0217 0448 0747
0482 0370 0264 0329 0090 0032 0216
0290 0154 0150 0092 0072 0179 0208 0519
ON MOST REMOTES
1. Turn on the TV.
2. Press and hold the TV and SEL buttons simultaneously for 3 seconds. The button will light.
3. With the button lit, point the remote at the TV and enter the TV’s 3, 4, or 5 digit code.
4. Verify by pressing the VOLUME + button. This should turn the TV VOLUME up.
5. Press the TV button to store the 3, 4, or 5 digit code. The button will blink twice to confirm the code is stored.
Your Upstar TV can be controlled with a universal remote and work with Comcast, Dish Network, Direct TV, RCA, etc…
RCA TV Remote codes, use the below codes to control your RCA TV with a universal remote.
5 digit codes for most programmable universal remote controls for RCA televisions are
11547 11447 10047 10093 10679 11047 11147 11247 11347
11781 11948 11953 12002 12187 12247 12434
The following 5 digit codes will work with your Sceptre TV
10878 11217 11360 11599
10000*
The following 4 digit codes will work with your Sceptre TV
0991 0000 0080
NOTE: If you have the RC64 remote, try codes 10878, 11217, 11360, and 11599.
Codes listed with an asterisk (*) are possible alternate codes for your TV. These alternate codes should operate the primary functions of your device in most cases (Power, Volume Up and Down, Mute).
Setup Instructions
1. Set the “Mode Switch” to TV.
2. Press and hold the “Mute” button and the “Select” button until the visible LED blinks twice.
3. Enter the 5 digit Code
The following code are the most popular for your Sceptre brand TV = 11360 11217 10878 11599 10000.
3, 4 & 5 Digit Universal Remote Control Codes For Hisense TVs
Codes to operate your Hisense TV
Hisense 3 digit remote codes
759
Hisense 4 digit remote codes
0073 0182 0216 0848 0208 0009 0145 0156
0227 0508 0696 0748 0753 0821 1170 0780
Hisense 5 digit remote codes
12183 10748 11758
TO USE THE HISENSE CODES WITH YOUR REMOTE – FOLLOW THE GENERAL INSTRUCTIONS BELOW:
1 Press and hold the clear TV button at the top until all 4 lights illuminate.
2 Select the code.
3 Press the pound button 1 time.
4 Go to the top and press the red power button until the TV turns off
Philips
Philips HDTV CODES
1129 1236 1237 1239 1261
1334 1351 1390 1411
Philips TV Codes
1004 1007 1011 1017 1018 1047
1053 1056 1057 1059
Philips DVD Codes
2032 2033 2045 2051 2091 2109
2156 2157 2158 2159
Philips Audio Codes
4006 4027 4039 2304
Philips Amplifier Codes
6047
Philips VCR Codes
3016 3036 3047 3061 3071 3135
3160 3173 3208 3216
Philips Receiver Tuner Codes
5000 5112 5138 5143 5145 5154
ON MOST REMOTES
1. Turn on the TV.
2. Press and hold the TV and SEL buttons simultaneously for 3 seconds. The button will light.
3. With the button lit, point the remote at the TV and enter the TV’s 3, 4, or 5 digit code.
4. Verify by pressing the VOLUME + button. This should turn the TV VOLUME up.
5. Press the TV button to store the 3, 4, or 5 digit code.
The button will blink twice to confirm the code is stored
Panasonic
Codes to operate your Panasonic TV
Panasonic HDTV Codes
1140 1169 1170 1194 1233 1234
1331 1336 1410 1417 1442
Panasonic TV Codes
1003 1010 1049 1053 1096 1123
1152 1231 1289 1292 1295
Panasonic DVD Codes
2031 2066 2075 2076 2104 2105
2106 2111 2151 2153 2154
Panasonic Audio Codes
4005 4018 4030 4038 4050 4051 4063 4050
ON MOST REMOTES
1  Turn on the TV.
2  Press and hold the TV and SEL buttons simultaneously for 3 seconds. The button will light.
3  With the button lit, point the remote at the TV and enter the TV’s 3, 4, or 5 digit code.
4  Verify by pressing the VOLUME + button. This should turn the TV VOLUME up.
5  Press the TV button to store the 3, 4, or 5 digit code. The button will blink twice to confirm the code is stored.
Your Panasonic TV can be controlled with a universal remote and work with Comcast, Dish Network, Direct TV, RCA, etc…
Codes to operate your Element TV
Newer codes 5 digit
11886 10178 11687 12183
Older codes 3 digit
046 005 028 043 048 076 096 155 004
051 127 151 153 154 231 236 238 247
252 168 121
ON MOST REMOTES
1  Turn on the TV.
2  Press and hold the TV and SEL buttons simultaneously for 3 seconds. The button will light.
3  With the button lit, point the remote at the TV and enter the TV’s 3, 4, or 5 digit code.
4  Verify by pressing the VOLUME + button. This should turn the TV VOLUME up.
5  Press the TV button to store the 3, 4, or 5 digit code. The button will blink twice to confirm the code is stored.
[Element TV can be controlled with a universal remote and work with RCA remotes, Comcast, DirecTV, Charter, and more.]

Wednesday, 8 March 2017

How to disassemble Fisher and Paykel smartdrive electronic washing machine

COMPLETE DISASSEMBLY
Ensure power and water supplies are disconnected before servicing. There is still mains power within the console when on/off switch in the off position.
1. Isolate from the power supply.
2. To remove the lid, open it to the upright position and lift it clear.
An anti-static wrist strap must be used when handling electronic modules. Clip the strap to the earth terminal at the rear of the top deck. Modules removed from Smartdrive for return must be protected from possible electrostatic damage while in transit by the use of the specialised packaging in which they were received.
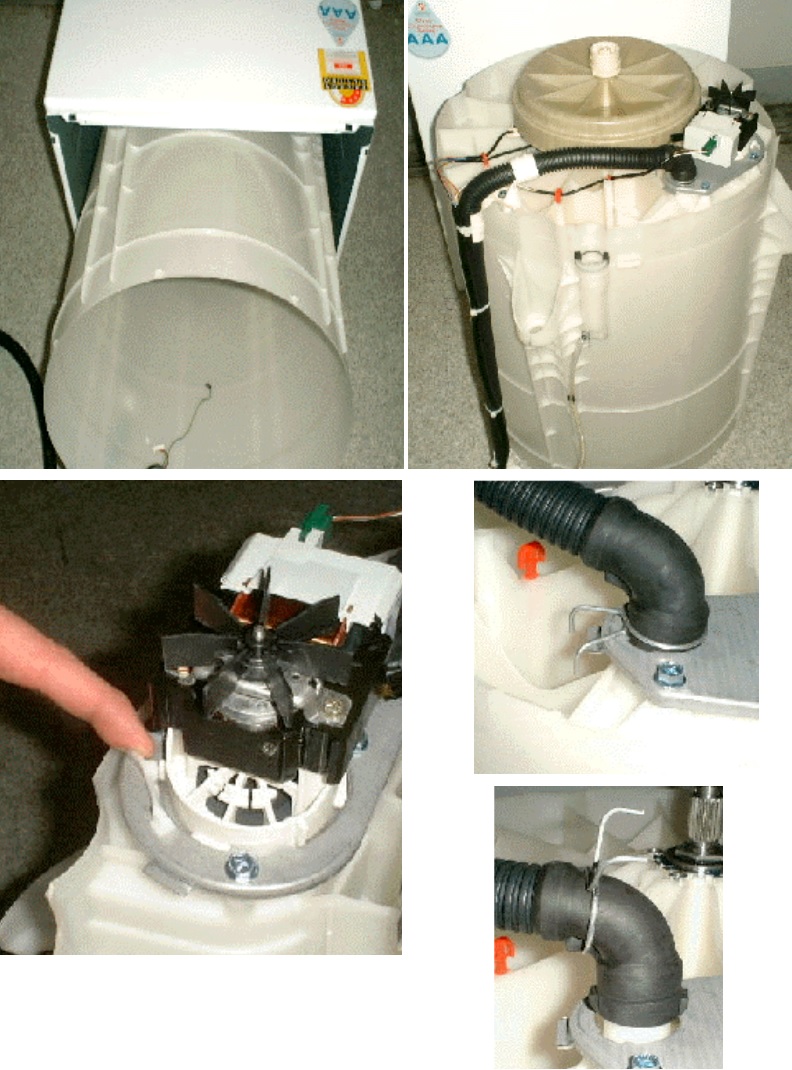
3. Remove the 2 screws from the rear of the top console, disconnect the earth lead. The console can now be raised for access to the Motor Controller Module, Display Module and associated wiring.
4. Disconnect the pressure tube from the pressure sensor.
5. Disconnect display module plug, the motor/pump harness plug and Rotor Position Sensor plug.
Remove the pump earth lead and mains cable earth lead from the Motor Controller Module.
Remove the plugs from the back of the mains cable clamp, undo the 2 screws holding the clamp and remove the clamp from the console feed the mains cable earth wire through the cable clamp opening.
NB: DON’T REMOVE THE EARTH CONNECTION FROM THE WRAPPER
6. Remove the two rubber buffers and screws from the front of the top deck. Release the retaining clips at rear of cabinet using a flat bladed screwdriver. Lift the top deck clear, feeding wiring through hole in top deck corner of the cabinet.
[The top deck cannot be hinged back without first releasing the rear clips from the cabinet and lifting at the same time.]
7. Unclip the bias spring from the front left suspension rod. Unclip the neck ring from the top of the outer bowl.
8. Remove the fabric softener dispenser, unscrew the agitator retaining nut and remove the agitator.
9. The inner bowl may now be lifted clear. (If the inner bowl is not easy to lift clear, then remove the three spline retaining screws and remove the driven spline.
Then pull the drive spline off the shaft and lift out the inner bowl).
If not already removed, the clutch can be disassembled at this stage by removing the three screws from the driven spline.
10. Remove the screw from the drain hose outlet bracket on the rear of the wrapper.
11. Unclip the harness duct from the right hand rear suspension and remove the suspension assembly by lifting the corner bracket upwards, and free the suspension assembly from the outer bowl.
12. Feed the drain hose inside the wrapper. Clip the drain hose fixture over the outer bowl with the attached hook.
13. Remove the remaining three suspension rod assemblies.
14. Lay the cabinet on its back, on protective material, and slide the outer bowl assembly out, but note that approximately 1 litre of water must be removed from the pump sump before laying the cabinet on its back.
15. To remove the pump, release the locking tab. Turn the pump anti-clockwise, lift it clear and remove the electrical connections.
16. Remove the two screws securing the wiring duct to the outer bowl base.
17. Remove the drain hose clamp. Twist the drain hose in an anti-clockwise direction to release the bayonet fitting. If changing the outer bowl, the pump securing plate can be removed at this stage by unscrewing the 4 x 3/8" securing bolts.
18. Remove the clamp from the pressure tube and pull the tube off the spigot on the pressure chamber.
19. Unclip the pump harness and then remove the complete assembly.

Wednesday, 15 February 2017

How to set up a home network server to share photos, music and movies in all your rooms

How to perform a (soft) restart (reset) or Power cycle on Sony's Android TV, Power cycle, How to hear the television sound through the speakers of a stereo receiver or home theater system
By setting up your computer or network storage device as a home network server, you can stream photos, music, and movies over your home network to a client, such as a TV, tablet, Smartphone, PlayStation or Blu-ray Player.
Both the server and the client need to support the home network function. To verify whether your Sony devices support the home network function, check the User Manual.
For Windows operating systems (depending on your operating system and preference) follow one of the links below to set up your home network server.
If using the Windows Media Player 12 software and the Windows7 or 8 or 8.1 operating system,
Follow this procedure.
For Macintosh and Linux operating systems, “Serviio” can be used. (Search for Serviio by Google)
Serviio is a free media server. It allows you to stream your media files (music, video or images) to renderer devices (e.g. a TV set, Bluray player, games console or mobile phone) on your connected home network.
There is also a paid “Pro edition” which further enhances the possibilities of sharing content in your connected household.
Serviio works with “many devices” from your connected home (TV, Playstation 3, XBox 360, smart phones, tablets, etc.). It supports profiles for particular devices so that it can be tuned to maximise the device's potential and/or minimize lack of media format playback support (via transcoding).
Serviio is based on Java technology and therefore runs on most platforms; including Windows, Mac and Linux (incl. embedded systems, e.g. NAS).
NOTES The third-party software recommended above are provided for your convenience and should be used at your own risk. Sony does not support nor guarantee the reliability of unsupplied 3rd party software.
After you set up the home network server, follow the set up instructions for your home network device to connect to the server.
How to perform a factory reset on Sony's Android TV
IMPORTANT: Performing a factory reset will wipe all of your data and settings on your TV.
Use the following steps if you would like to perform a factory reset on Sony's Android TV:
Press the HOME button to enter the home screen.
Using your standard remote control, press the down arrow button and navigate down the media shelves until you reach Settings.
On the TV shelf, scroll to the right using the right arrow button until you reach Storage & reset.
Navigate down using the down arrow button to Factory data reset.
Then select Erase everything.
TIP It is recommend creating a backup of your channel list onto a USB stick. This will allow you to easily restore your channel list after performing a factory reset. The following steps detail how to back up your channel list:
Save you channel list by exporting the data onto an empty USB stick
Perform a factory reset
Insert the USB stick with your channel list into your TV
Import your channel list back onto your TV
NOTES  The factory reset may take a few moments. Please wait until your're informed that the process has been completed 
If you had set a PIN-code on your TV, you will be asked to enter this PIN-code when you select the option "Erase everything"  
After the Factory Reset process completes successfully, your TV proceeds into the Initial Setup wizard. You will need to agree to the Google Terms of Service and Google Privacy Policy
The Touchpad pairing sequence will have to be activated again after a factory reset. 
Soft RESET by using the following procedure
Press and hold the Power button on the remote until the "Power off" message appears/ is displayed (approx. 5 seconds)
Release the Power button when "Power off" message appears on-screen
The TV will then turn itself off. Wait for a minute before turning it on again
IMPORTANT: Performing a (soft) reset does not erase your settings or downloaded apps; it just resets the TV's software.
How do I perform a (soft) restart (reset) or Power cycle on Sony's Android TV
If your TV isn't behaving properly - for example it's unresponsive or is stuck on a black screen - you may need to perform a (soft) reset.
Please use the following procedure
Soft reset
Press and hold the Power button on the remote until the "Power off" message appears/ is displayed (approx. 5 seconds)
Release the Power button when "Power off" message appears on-screen
The TV will begin a reboot sequence and will restart automatically (approx. 1 minute).
Power cycle
Alternatively, if your remote isn't working, you can perform a Power cycle by:
Unplugging the TV's AC power cord from the electrical outlet for approx. 2 minutes
Plugging the AC power cord back in to the electrical outlet
IMPORTANT Performing a reset does not erase your settings or downloaded apps; it just resets the TV's software.
[If you would like to revert your TV back to its original factory settings, you will need to perform a factory reset. Beware that, performing a factory reset will wipe all of your data and settings on your TV.]
How to hear the television sound through the speakers of a stereo receiver or home theater system
The two most common methods to allow the television sound be heard through the speakers of a stereo receiver or home theater system are
HDMI connection using the Audio Return Channel (ARC) feature
Connection using Coaxial Digital Cable, Optical Digital Cable, or Audio Cable
NOTES  Both devices being connected must support the ARC feature. HDMI ports may be marked with ARC to show which one to use.  If not, check your product manual or specifications to see if the ARC feature is supported.
If you find that your TV, A/V receiver or home theater system does not support ARC, you will need to use Option Coaxial Digital Cable, Optical Digital Cable, or Audio Cable to connect your devices.
Make sure that both devices support ARC functionality.
Make sure that the TV and receivers are connected using an HDMI cable.
Connect the cable to the HDMI port that is labeled ARC or the port identified in your manual that supports ARC.
Turn on the Control for HDMI setting on both the TV and the receiver or home theater system.
NOTE The steps required to enable the Control for HDMI feature may vary. Check the operating instructions supplied with the devices for model-specific steps.
Option 2  Connection using Coaxial Digital Cable, Optical Digital Cable, or Audio Cable
Connect a Coaxial Digital Cable, Optical Digital Cable, or Audio cable to the Audio Output jack of the television.
Connect the other end of the cable to the corresponding jacks on the stereo receiver or home theater system.
NOTE  Depending on the stereo receiver or home theater system being used, the audio input may be labeled TV INPUT or VIDEO INPUT.
Turn on the television.
Set the television sound to the desired setting of either Fixed or Variable.
Turn on the stereo receiver or home theater system.
Set the stereo receiver or home theater system to the proper input.

How to use the Bravia Sync Control for HDMI for Sony TVs

HDMI connectivity potential issues and how to solve them
In case you experience certain symptoms with HDMI connections such as:
Devices not detected
Other HDMI related symptoms
Try the following steps
Reconnect the HDMI cable
Disconnect your TV from the main AC electrical outlet (perform a Power Cycle for your TV) 
Disconnect any external devices from your TV and any AC electrical outlet (perform a Power Cycle for the connected device(s))
Wait a minute and then reconnect your TV and other devices together
Insert any AC power cords back into the electrical outlet
Alternatively, if the issue is still unresolved, please try the following sequence of procedures and verify after each step if the problem is solved:
Perform a Power Cycle
How to perform a (soft) restart (reset) or Power cycle on Sony's Android TV
If your TV isn't behaving properly - for example it's unresponsive or is stuck on a black screen - you may need to perform a (soft) reset.
Use the following procedure
Soft reset
Press and hold the Power button on the remote until the "Power off" message appears/ is displayed (approx. 5 seconds)
Release the Power button when "Power off" message appears on-screen
The TV will begin a reboot sequence and will restart automatically (approx. 1 minute)
Power cycle
Alternatively, if your remote isn't working, you can perform a Power cycle by:
Unplugging the TV's AC power cord from the electrical outlet for approx. 2 minutes
Plugging the AC power cord back in to the electrical outlet.
IMPORTANT: Performing a reset does not erase your settings or downloaded apps; it just resets the TV's software.
If you would like to revert your TV back to its original factory settings, you will need to perform a factory reset. Please be aware that, performing a factory reset will wipe all of your data and settings on your TV.
Factory Reset
To make the most out of your TV, we strongly recommend that you always keep it up-to-date with the latest firmware and software updates.. 
 Hot plugging: adding or removing devices from your TV while it is still running and have the Operating System (OS) recognise the change automatically.
Bravia Sync is a feature that enables your television's remote to control other Bravia Sync-compatible equipment, through the use of the HDMI CEC (Consumer Electronics Control) technology. Controlling other devices such as Blu-ray Disc Players or Home Theatre Systems becomes particularly convenient and easy once the communication between the devices is established, using Bravia Sync.
The control you will be granted - using the TV's remote - over the device you connected will depend on the type of device, but it will typically include the possibility to:
Turn ON or OFF the device
Navigate the menus of the device
Control playback operations
Control the volume setting of the device.
IMPORTANT: Your devices must be connected together using certified HDMI cables for this feature to work properly.
Controlling Bravia Sync-compatible equipment
Simply follow these steps to control Bravia Sync-compatible equipment using the TV’s remote:
First, you need to make sure the "Control for HDMI" setting is activated on your devices.
On the TV, press HOME, then select  > External Inputs > HDMI Set-up > Control for HDMI > ON. 
For other devices in your system, activate “Control for HDMI” in the settings. For details, refer to the instruction manual of the connected equipment.
Then, press SYNC MENU on the TV's remote, select [HDMI Device Selection] and select the desired equipment.
NOTE Bravia Sync-compatible equipment (except audio systems) will be listed as a new input source under [Inputs] in the Home Menu.
See the video below for more information and guidance on how to get started. (Note that the video is only available in English.)
Using the Sync Menu
The Sync Menu, reached by pressing the Sync Menu button on your TV's remote, offers the following items.
HDMI Device Selection
Enables the selection of Bravia Sync-compatible equipment to be controlled by the TV’s remote.
Device Control|
Displays the menu, options and title list of the connected equipment, or turns the equipment off.
Speakers
Switches the speaker output between the TV and the connected audio equipment.
TV Control
Displays the menu and options of the TV, or shows/hides the display items on the TV screen.
Return to TV
Returns to the TV tuner.

Sunday, 12 February 2017

How to replace the keyboard - Toshiba Tecra 9000 series laptop

Keyboard is the most venerable to get damaged in most of the laptops.  Replacing it can be done at home, if you have tools to do this work.
1. Turn the computer upside down.
2. Remove one M2.5x16 silver screw securing the keyboard on the bottom cover.
2. Turn the computer right side up and open the display panel.
3. Using the case separator, unlatch the keyboard holder at the top of the keyboard.
4. Remove two M2.5x2.8 silver screws securing the keyboard.
5. Lift out the keyboard and set it as shown above(Place an insulator between the keyboard and the LCD to prevent scratches on the LCD).
6. Disconnect the keyboard cable from PJ123 on the system board.
Do the reverse procedure to install a new keyboard

LG 32LK610BPUA, LG 32LK610BBUA LCD TVs – How to upgrade the software, fault checking method

  Software update procedure USB (1) Insert the USB memory Stick to the USB port (2) Automatically detect the SW Version and show the bel...