Sunday, 15 July 2018

HP OMEN 15 - Notebook – Disassembling procedure


HP OMEN 15 - Notebook – Disassembling procedure – How to remove the Battery – How to remove the case – How to remove the SSD
How to remove Bottom cover
Before replacing the bottom cover, follow these steps:
1. Turn off the computer. If you are unsure whether the computer is off or in Hibernation, turn the computer on, and then shut it down through the operating system.
2. Disconnect the power from the computer by unplugging the power cord from the computer.
3. Disconnect all external devices from the computer.
Remove the bottom cover:
1. Close and position the computer upside down with the front toward you.
2. Pry up to remove the rubber strips from the bottom of the computer
3. Remove the 11 Phillips PM2.0×5.0 screws that secure the bottom cover to the computer
4. Lift the bottom cover off the computer.
How to Disconnect the battery
Before disconnecting the battery, follow these steps:
1. Turn off the computer. If you are unsure whether the computer is off or in Hibernation, turn the computer on, and then shut it down through the operating system.
2. Disconnect the power from the computer by unplugging the power cord from the computer.
3. Disconnect all external devices from the computer.
4. Remove the bottom cover
Disconnect the battery:
 Pull to disconnect the battery cable from the system board connector.
How to remove WLAN module
Before replacing the WLAN module, follow these steps:
1. Turn off the computer. If you are unsure whether the computer is off or in Hibernation, turn the computer on, and then shut it down through the operating system.
2. Disconnect the power from the computer by unplugging the power cord from the computer.
3. Disconnect all external devices from the computer.
4. Remove the bottom cover
5. Disconnect the battery 
Remove the WLAN module:
1. Disconnect the WLAN antenna cables (1) from the terminals on the WLAN module.
2. Remove the Phillips PM2.0×3.0 screw (2) that secures the WLAN module to the system board.
3. Remove the WLAN module (3) by pulling the module away from the slot.
How to remove Solid-state drive
Before removing the solid-state drive, follow these steps:
1. Turn off the computer. If you are unsure whether the computer is off or in Hibernation, turn the computer on, and then shut it down through the operating system.
2. Disconnect the power from the computer by unplugging the power cord from the computer.
3. Disconnect all external devices from the computer.
4. Remove the bottom cover
5. Disconnect the battery
Remove the solid-state drive:
1. Remove the Phillips PM2.0×3.5 screw (1) that secures the solid-state drive to the system board.
2. Remove the solid-state drive (2) by pulling the drive away from the slot at an angle.
How to remove Battery
Before replacing the battery, follow these steps:
1. Turn off the computer. If you are unsure whether the computer is off or in Hibernation, turn the computer on, and then shut it down through the operating system.
2. Disconnect the power from the computer by unplugging the power cord from the computer.
3. Disconnect all external devices from the computer.
4. Remove the bottom cover
Remove the battery:
1. Disconnect the battery cable from the system board (1) .
2. Remove the four Phillips PM2.0×4.0 screws (2) that secure the battery to the computer.
3. Lift the battery (3) from the computer.
How to remove TouchPad
Before replacing the TouchPad, follow these steps:
1. Turn off the computer. If you are unsure whether the computer is off or in Hibernation, turn the computer on, and then shut it down through the operating system.
2. Disconnect the power from the computer by unplugging the power cord from the computer.
3. Disconnect all external devices from the computer.
4. Remove the bottom cover
5. Remove the battery
Remove the TouchPad:
1. Disconnect the TouchPad cable from the system board (1).
2. Remove the Mylar from atop the middle screw of the touchpad (2).
3. Remove the ƭve Phillips PM1.5×2.0 broad head screws (3) that secure the TouchPad to the computer.
4. Remove the TouchPad (4).

Saturday, 14 July 2018

How to replace the battery of Apple iPhone 6 Plus


Power off your iPhone before beginning disassembly. 
Remove the two 3.6 mm Pentalobe screws next to the Lightning connector.
The next two steps demonstrate using the iSclack, a great tool for safely opening the iPhone 6 Plus that we recommend for anyone doing more than one repair. 
 If the plastic depth gauge is attached at the center of the iSclack, remove it now—it's not needed for larger phones like the iPhone 6 Plus.
Close the handle on the iSclack, opening the suction cup jaws.
Place the bottom of your iPhone in between the suction cups.
Position the iSclack's upper suction cup against the display, near the home button. Open the handles to close the jaws of the iSclack. Center the suction cups and press them firmly onto the top and bottom of the iPhone.
Hold onto your iPhone securely and close the handle of the iSclack to separate the suction cups, pulling the front panel up from the rear case. The iSclack is designed to safely open your iPhone enough to separate the pieces, but not enough to damage any of the display cables. Peel the two suction cups off your iPhone.
If you don't have an iSclack, use a single suction cup to lift the front panel: Press a suction cup onto the screen, just above the home button.
 Be sure the cup is pressed securely onto the screen to get a tight seal.
If you don't have an iSclack, use a single suction cup to lift the front panel: Press a suction cup onto the screen, just above the home button.
Be sure the cup is pressed securely onto the screen to get a tight seal.
Pull the plastic nub to release the vacuum seal on the suction cup. Remove the suction cup from the display assembly.
Pull the home button end of the front panel assembly away from the rear case, using the top of the phone as a hinge. During the next few steps, until you remove the front panel assembly, keep it supported at a 90 degree angle in relation to the rear case
Several clips along the top edge of the front panel form a partial hinge, allowing the front panel assembly to swing open like a book. During reassembly, align the clips just below the top edge of the rear case. Then, slide the front panel upward until its top edge is flush with that of the rear case.
While holding the front panel open at about a 90 degree angle, remove the following screws securing the front panel assembly cable bracket:
Three 1.2 mm Phillips #00 screws
One 1.5 mm Phillips #00 screw
One 2.9 mm Phillips #00 screw
Remove the front panel assembly cable bracket from the logic board.
In the next four steps, take care to pry up only on the cable connectors, and not on their sockets on the logic board. While still supporting the front panel, use a plastic opening tool to disconnect the front facing camera and earpiece speaker cable connector.
Use a plastic opening tool to disconnect the home button cable connector.
Use a plastic opening tool to disconnect the display data cable connector. When reassembling your phone, the display data cable may pop off the connector. This can result in white lines or a blank screen when powering your phone back on. If that happens, simply reconnect the cable and power cycle your phone. The best way to power cycle your phone is to disconnect and reconnect the battery connector.
Finally, use a plastic opening tool to disconnect the digitizer cable connector.
Remove the front panel assembly rom the rear case.
Remove the following screws from the battery connector bracket:
One 2.3 mm Phillips #00 screw
One 3.1 mm Phillips #00 screw
Remove the metal battery connector bracket from the iPhone.
Use a plastic opening tool to gently pry the battery connector up from its socket on the logic board. Take care to only pry up on the battery connector, and not the socket on the logic board. If you pry up on the logic board socket, you may break the connector entirely.
Peel back the first battery adhesive tab from the bottom right edge of the battery. Use your fingers or blunt tweezers. Be extra careful when working near the battery; puncturing a lithium-ion battery can release dangerous chemicals and cause a fire.
Gently pull the battery adhesive tab away from the battery, toward the bottom of the iPhone.
To avoid tearing the adhesive strip, be careful not to pull against the battery or lower components.
Continue pulling, allowing the strip to slowly slip out from between the battery and the rear case. When you feel increased resistance from the strip, stop pulling and continue with the next step.
If the battery adhesive tabs break during the removal process, use your fingers or blunt tweezers to retrieve the remaining length of adhesive, and continue pulling.
When you feel increased resistance from the adhesive strip, pull it gently around the lower right corner of the battery. Avoid snagging the adhesive strip on the corner of the battery or the strip may tear or break.
Continue pulling the adhesive tab upward and away from the right edge of the battery, allowing it to slowly slide out from between the battery and the rear case, until the strip comes free from the iPhone. Don't allow the adhesive strip to snag on the battery connector, or it may tear or break off.
Peel back the second battery adhesive tab from the bottom left edge of the battery. Again, gently pull the battery adhesive tab upward and away from the battery, allowing the adhesive strip to slowly slide out from between the battery and the rear case. Continue pulling the adhesive tab until you feel increased resistance, and then stop.
When you feel increased resistance from the adhesive strip, pull it gently around the lower left corner of the battery. Don't allow the adhesive strip to snag on the corner of the battery, or it may tear or break off. Continue pulling the adhesive tab upward and away from the left edge of the battery, allowing it to slowly slide out from between the battery and the rear case, until the strip comes free from the iPhone.
Peel back the final battery adhesive tab from the bottom edge of the battery. Gently pull the battery adhesive tab upward and away from the battery, allowing the adhesive strip to slowly slide out from between the battery and the rear case.
Continue pulling until the final strip comes free from the iPhone.
Flip the iPhone back over and insert a plastic card between the left side of the battery and the rear case. Be careful to keep the card as flat as possible to avoid bending the battery, which may damage it and cause it to release dangerous chemicals. Press the card in farther to break up the adhesive behind the battery.
Remove the battery from the iPhone.

Friday, 13 July 2018

Acer Aspire E15 - Troubleshooting Hardware and software problems


Acer Aspire E15:  TROUBLESHOOTING 
Sound Problems
Perform the following, one at a time.
1. Boot the computer.
2. Navigate to Start > Control Panel > System and Maintenance > System > Device Manager. Check the Device Manager to determine that:
#The device is properly installed
# There are no red Xs or yellow exclamation marks
# There are no device conflicts
# No hardware is listed under Other Devices
3. If updated recently, roll back the audio driver to the previous version.
4. Remove and reinstall the audio driver.
5. Make sure that all volume controls are set mid range:
# Click the volume icon on the taskbar
# Drag the slider to 50. Confirm that the volume is not muted.
# Click Mixer to verify that other audio applications are set to 50 and not muted.
6. Navigate to Start´ Control Panel´ Hardware and Sound´ Sound. Confirm that Speakers are selected as the default audio device (green check mark).
NOTE:If Speakers does not show, right-click on the Playback tab and select Show
Disabled Devices (clear by default).
7. Select Speakers and click Configure to start Speaker Setup. Follow the on-screen prompts to configure the speakers.
8. Remove any recently installed hardware or software.
9. Restore system and file settings from a known good date using System Restore.
10. If the issue is remains, repeat step 9, selecting an earlier time and date.
11. Reinstall the Operating System.
Microphone Failure
1. Check that the microphone is enabled. Navigate to Start > Control Panel > Hardware and Sound > Sound and select the Recording tab.
2. Right click on the Recording tab and select Show Disabled Devices (clear by default). The microphone appears on the Recording tab.
3. Right click on the microphone and select Enable.
4. Select the microphone then click Properties. Select the Levels tab.
5. Increase the volume to the maximum setting and click OK.
6. Test the microphone hardware:
# Select the microphone and click Configure.
# Select Set up microphone.
# Select the microphone type from the list and click Next.
# Follow the on-screen prompts to complete the test.

HDD Not Operating Correctly 
If the HDD fails to operate correctly, perform the following:
1. Disconnect all external devices.
2. Run a complete virus scan using up-to-date software to confirm the computer is virus free.
3. Run the Windows Vista Startup Repair Utility:
a. Insert the Windows Vista Operating System DVD in the ODD and restart the computer.
b. When prompted, press any key to start to the operating system DVD.
c. When the Install Windows screen appears, click Next.
d. Select Repair your computer.
e. When the System Recovery Options screen appears, click Next.
f. Select the appropriate operating system, and click Next.
NOTE: Click Load Drivers if controller drives are required.
g. Select Startup Repair.
NOTE: Startup Repair attempts to locate and resolve issues with the computer.
h. When complete, click Finish.
If an issue is discovered, follow the on-screen information to resolve the problem.
1. Run the Windows Memory Diagnostic Tool. For more information see Windows Help and Support.
2. Restart the computer and press F2 to enter the BIOS Utility. Check the BIOS settings are correct and that CD/DVD drive is set as the first boot device on the Boot menu.
3. Confirm all cables and jumpers on the HDD and ODD are set correctly.
4. Remove any recently added hardware and associated software.
5. Run the Windows Disk Defragmenter. For more information see Windows Help and Support.
6. Run Windows Check Disk by entering chkdsk /r from a command prompt. For more information see Windows Help and Support.
7. Restore system and file settings from a known good date using System Restore.
8. If the issue is not fixed, repeat the preceding steps and select an earlier time and date.
9. Replace the HDD.
Computer Shuts Down Intermittently
If the system powers off at intervals, perform the following.
1. Makes sure the power cable is properly connected to the computer and the electrical outlet.
2. Remove all extension cables between the computer and the outlet.
3. Remove all surge protectors between the computer and the electrical outlet. Plug the computer directly into a known serviceable electrical outlet.
4. Disconnect the power and open the casing to check the Thermal Unit and fan airways are free of obstructions.
5. Remove all external and non-essential hardware connected to the computer that are not necessary to boot the computer to the failure point.
6. Remove any recently installed software.
No POST or Video
If the POST or video does not appear, perform the following, one at a time.
1. Make sure that internal display is selected. Switching between internal and external by pressing Fn+F5. Reference Product pages for specific model procedures.
2. Make sure the computer has power by checking for one of the following:
# Fans start up 3 Status LEDs illuminate
3. Drain stored power by removing the power cable and battery. Hold the power button for 10 seconds.
4. Connect the power and reboot the computer.
5. Connect an external monitor to the computer and switch between the internal display and the external display is by pressing Fn+F5.
6. If the POST or video appears on the external display only.
7. Disconnect power and all external devices including port replicators or docking stations. Remove any memory cards and CD/DVD discs.
8. Start the computer. If the computer boots correctly, add the devices one by one until the failure point is discovered.
9. Reseat the memory modules.
10. Remove the drives
Abnormal Video
If the video appears abnormal, perform the following, one at a time.
1. Boot the computer.
# If permanent vertical/horizontal lines or dark spots appear in the same location, the LCD is faulty and should be replaced.
# If extensive pixel damage is present (different colored spots in the same locations on
the screen), the LCD is faulty and should be replaced
NOTE:Make sure that the computer is not running on battery alone as this may reduce display brightness.
2. Adjust the brightness to its highest level. Refer to the User Manual for instructions on adjusting the settings. If the display is too dim at the highest brightness setting, the LCD is faulty and should be replaced.
3. Check the display resolution is correctly configured:
# Minimize or close all Windows.
# If display size is only abnormal in an application, check the view settings and control/mouse wheel zoom feature in the application.
# If desktop display resolution is not normal, right-click on the desktop and select
Personalize Display Settings.
# Click and drag the Resolution slider to the desired resolution.
# Click Apply and check the display. Readjust if necessary.
4. Roll back the video driver to the previous version if updated.
5. Remove and reinstall the video driver.
6. Check the Device Manager to determine that:
# The device is properly installed. There are no red Xs or yellow exclamation marks
# There are no device conflicts
# No hardware is listed under Other Devices.
Intermittent Problems 
Intermittent system hang problems can be caused by a variety of reasons that have nothing to do with a hardware defect, such as: cosmic radiation, electrostatic discharge, or software errors. FRU replacement should be considered only when a recurring problem exists.
When analyzing an intermittent problem, perform the following:
1. Run the advanced diagnostic test for the system board in loop mode at least 10 times.
2. If no error is detected, do not replace any FRU.
3. If an error is detected, replace the FRU. Rerun the test to verify that there are no more errors.
Undetermined Problems
The diagnostic problems does not identify which adapter or device failed, which installed devices are incorrect, whether a short circuit is suspected, or whether the system is inoperative.
Perform the following procedures to isolate the failing FRU (do not isolate non-defective FRU).
NOTE: Verify that all attached devices are supported by the computer.
NOTE: Verify that the power supply being used at the time of the failure is operating correctly.
1. Remove power from the computer.
2. Visually check them for damage. If any problems are found, replace the FRU.
3. Remove or disconnect all of the following devices:
# Non-Acer devices
# Printer, mouse, and other external devices
# Battery pack
# Hard disk drive
# DIMM
# CD-ROM/Diskette drive Module
# PC Cards
4. Apply power to the computer.
5. Determine if the problem has changed.
6. If the problem does not recur, connect the removed devices one at a time until failing FRU is found.
7. If the problem remains, replace the following FRUs one at a time. Do not replace a non-defective FRU:
# System board
# LCD assembly

Tuesday, 10 July 2018

Aiwa NSX-800 Compact disc Stereo system – schematic and PWBs


Optical block: KSS-1550A
Main board PWB and Schematic

Power amplifier board schematic and PWB
Front PWB and schematic
4CD section schematic and PWB
CD deck mechanism - exploded view

Sunday, 8 July 2018

Samsung Galaxy S3 – How to replace the front glass


Samsung Galaxy S3:  How to replace the front glass  
If your phone already has a protective screen applied to it, you are ready to begin. If it doesn't, cut a piece of packaging tape the size of the screen and apply it to the screen. This will help you remove the broken glass later.
With a plastic opening tool, pry open the back case. It will come out very easily.
Take out the battery. There are no cables attached.
If your provider/version of phone takes a SIM card, remove it by pushing it in a bit until you hear a small click, and then slide it out. Sprint USA does not use SIM card.
At this point you can already go to the next step, which is using a heat gun. However I felt safer by taking out the motherboard too.
You need to have lots of patience in this procedure. Take your time. Using an infrared thermometer heat the surface to 170-180° F (roughly 70-80° C). This will loosen the glue but not damage the electronics. Hold the gun at about 3 inches from your phone (in this picture it looks like its right on top). With the heat gun set to low, heat up the borders for about 3 to 5 minutes depending on the strength of your heat gun. You must be careful when using the heat gun on this device. If the device is heated up too much then it may melt the digitizer and cause discoloration. If you start to see any discoloration then shut off the gun immediately. If you are working with a hair dryer, it might take up to 1 hour. This melts the glue that holds the glass to the frame and to the display. The glass is glued to them.
Using a guitar pick or a plastic opening tool, very carefully start to work separating the edges of the glass. Make sure to go from top to bottom. You will need to use the heat gun a number of times as you go down separating the glass. For glasses with lots of damage you will need to go extra carefully as to not damage the LCD with the shattered glass pieces.
When you start separating the screen, you need to start from the top borders and work your way to the center, ungluing the whole screen from top to bottom. Leave some opening tools in to prevent the glass from bonding again to the LCD. Be extra careful when you get to the bottom because the menu buttons are glued to the glass. Do not pull the glass just yet, you might damage the cables. Pull the screen from the top to the bottom to the point where you can see the menu and return button cables.
Extra attention is necessary with this step, don't damage the buttons or cable. With a spudger, detach the buttons from the inner side of the glass. This might require a little extra heat. Also, the best strategy is to start in the middle, under the black ribbon that connects the two buttons, and then move sideways to separate each one.
Take out the broken glass. I was able to take it all in one piece. If your glass is very shattered you will need to pick up the small pieces with tweezers, one by one or stick tape to the glass before you take it out. You can also use screen protectors.
Take this small metal piece from your old glass, you will need to put it in the new one. Clean up the glue that remains on the borders. A small microfiber with a bit of WD40 or windex can help you take all the glue off. Be sure to not use too much WD40 or windex. When cleaning out the glue, do NOT attempt to scrap glue out of the cracks between the LCD and the frame. A very small amount of force toward the center or from underneath will crack the LED. Cut up two small 1mm pieces of the sticker tape and glue the buttons to the phone to keep them in place. It's very important to make sure the buttons line up exactly with the picture.
Put pieces of the sticker tape along the inner frame of the phone. Clean up the digitizer with lint free wipes or a clean microfiber towel. I used some lens cleaner to leave it spotless and smudge free.
Take out the plastic from the new glass, make sure you dont touch the inner side of the screen. There are thin protective plastic layers on both sides of the glass. Peel them out before placing the glass on your phone.
Check the glass against the light to make sure it is streak free before applying. If packaging left noticeable marks clean with glass cleaner and let dry before applying Peel off the paper from the sticker tape and put on the new glass. Press on the edges to secure adhesion.

Tuesday, 3 July 2018

How to enter service mode – Samsung Plasma TV PA43H4900AR – Troubleshooting, LED blinking codes


Samsung PA43H4900AR,  PA51H4900AR Plasma TV: Troubleshooting
* Check the various cable connections first.
* Check to see if there is a burnt or damaged cable.
* Check to see if there is a disconnected or loose cable connection.
* Check to see if the cables are connected according to the connection diagram.
Check the power input to the Main Board.
How to distinguish if the problem is caused by Main board or Logic Board
No Video
If the problem is No Video but Logic Board is on and Indication LED is blinking repeatedly and faster than normal booting, replace the Main/Logic board.
Logic test pattern > OK
Picture Not Good
Main board fault.
Logic test pattern > Not Good
Picture > Nog Good.
Module (Panel / Logic) or Main board.
How to check Logic test pattern
a) Entering Factory mode.
b) Move to SVC menu.
c) Move to Test Pattern.
d) Move to Test Pattern.
H/W Logic test pattern
Operating Logic LED and Front Cover LED (IR)
Normal:   LED blink time is once per 0.5s
Abnormal:   LED Blink interver is 0.3s and Off time 4s
LED blinking codes and faulty PWBs

Fault Symptom > No Power
* The LEDs on The front panel do not work when connecting The power cord.
* The SMPS relay does not work when connecting the power cord.
* The units appear to be dead.
The SMPS relay or the LEDs on the front panel does not work when connecting the power cord if the cables are improperly connected or the Main Board or SMPS is not functioning. In this case, check the following:
* Check the internal cable connection status inside the unit.
* Check the fuses of each part.
* Check the output voltage of SMPS.
* Replace the Main Board.
No Video
Audio is normal but no picture is displayed on the screen.
* The output voltage of the Main SMPS.
* This may happen when the LVDS cable connecting the Main Board and the Panel is disconnected.
No sound
Video is normal but there is no sound.
* When the speaker connectors are disconnected or damaged.
* When the sound processing part of the Main Board is not functioning.
* Speaker defect.
* SMPS not supplying voltage to the main board.
How to enter the service mode [Factory mode]
To enter ‘Service Mode’ Press the remote -control keys in this sequence 
* If you do not have Factory remote control
NTSC > Standby èMute è 1 è 8 è 2 è Power
PAL > Standby è Info è Menu è Mute è Power
With a factory remote control:
Info è Factory
If you do not have a factory remote control, can’t control some menu.
White balance adjustment
1) Into the Factory Mode.
2) Select ADC/WB menu.
3) Select ADC menu
Perform Calibration in the Lattice Pattern before adjusting the White Balance.
Use other equipment only after comparing the result with that of the Master equipment.
Method of Color Calibration (AV)
1) Apply the NTSC Lattice (N0. 3) pattern signal to the AV IN 1 port.
2) Press the Source key to switch to “AV1” mode.
3) Enter Service mode.
4) Select the “ADC” menu.
5) Select the “AV Calibration” menu.
6) In “AV Calibration Off” status, press the “►” key to perform Calibration.
7) When Calibration is complete, it returns to the high-level menu.
8) You can see the change of the “AV Calibration” status from Failure to Success.
Method of Color Calibration (Component)
1) Apply the 720p Lattice (N0. 6) pattern signal to the Component IN 1 port.
2) Press the Source key to switch to “Component1” mode.
3) Enter Service mode.
4) Select the “ADC” menu.
5) Select the “Comp Calibration” menu.
6) In “Comp Calibration Off” status, press the “ ►” key to perform Calibration.
7) When Calibration is complete, it returns to the high-level menu.
8) You can see the change of the “Comp Calibration” status from Failure to Success.
Method of Color Calibration (PC)
1) Apply the VESA XGA Lattice (N0. 21) pattern signal to the PC IN port.
2) Press the Source key to switch to “PC” mode.
3) Enter Service mode.
4) Select the “ADC” menu.
5) Select the “PC Calibration” menu.
6) In “PC Calibration Off” status, press the “ ►” key to perform Calibration.
7) When Calibration is complete, it returns to the high-level menu.
8) You can see the change of the “PC Calibration” status from Failure to Success.
Method of Color Calibration (HDMI)
1) Apply the 720p Lattice (N0. 6) pattern signal to the HDMI1/DVI IN port.
2) Press the Source key to switch to “HDMI1” mode.
3) Enter Service mode.
4) Select the “ADC” menu.
5) Select the “HDMI Calibration” menu.
6) In “HDMI Calibration Off” status, press the “►” key to perform Calibration.
7) When Calibration is complete, it returns to the high-level menu.
8) You can see the change of the “HDMI Calibration” status from Failure to Success.


Sunday, 24 June 2018

Samsung Galaxy Tab 2 7.0 – Disassembling procedure


Samsung Galaxy Tab 2 7.0 – Disassembling procedure – How to remove the case – How to remove the battery – How to remove the motherboard Samsung Galaxy Tab 2 7.0
Remove the SD card from the SD card slot.
Make sure the device is completely powered down.
Use the prying tool to separate the front and rear panels by slipping the tool underneath the screen edge and sliding it around the entire device. Be sure to unclip all of the clips on the back panel or it will be difficult for you to pull it off and may damage the tablet.
Remove the battery Flex Cable from its socket by placing the pry tool under the wires and gently prying it out.
When you are placing in the new battery, it helps to connect the socket first or else it becomes difficult to properly align once the battery is in place.
Using the Phillips precision screw driver remove the six 4 mm screws holding the battery in place.
Once the battery is loose, remove as shown.
Using the Phillips #00 precisions screwdriver, remove the 12 4mm screws holding in the motherboard.
Release all flex cable connections at the bottom section of the motherboard.
Using the plastic pry tool release connections for both loudspeakers.
Once disconnected gently remove the loudspeakers from the device.
Release all flex cables on the right side of the device motherboard as shown.
Using the plastic pry tool, release the touch screen flex cable from its socket.
With the same tool release the LCD screen flex cable form its socket
Release all flex cables on the upper portion of the motherboard.
Using the plastic pry tool release the sensor flex cable from its socket.
With the same tool release the camera flex cable from its socket.
Release the front camera flex cable from its socket.
Release the side button's flex cable from its socket
Gently remove the motherboard from the device. Be sure no flex cables get caught on the motherboard while you are removing it or the flex cables may become damaged.
It is easier to begin lifting the motherboard from the top rather than the bottom.
Disassembley

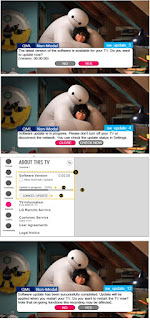
LG 32LK610BPUA, LG 32LK610BBUA LCD TVs – How to upgrade the software, fault checking method

  Software update procedure USB (1) Insert the USB memory Stick to the USB port (2) Automatically detect the SW Version and show the bel...